Microsoft 365 Client Credentials Grant client setup guide
This guide explains how to set up an Entra / Azure custom OAuth client configuration for use with the Client Credentials Grant flow. This is a non-interactive flow that requires administrator approval, but does not require user involvement or authorization. As a result, while this flow is more complex to set up, it is ideal for unattended applications or services that need to access mailboxes without user interaction.
This feature requires a subscription to Auth-Email's Pro plan.
💡 All four of the following steps are required in order to successfully configure and use the Client Credentials Grant flow. However, once set up, custom clients that are created using this configuration can also be used with the Authorization Code Grant flow or the Resource Owner Password Credentials Grant flow if needed.
If you need to link new accounts with Auth-Email in future, you do not need to repeat all of these steps. Instead, just run the
Add-MailboxPermissioncommand below for each new account you want to access. Make sure you have logged into the account at least once before running the command, to ensure the mailbox is fully provisioned.
1. Create an Entra / Azure application
The first step is to create a new application registration in the Microsoft Entra admin center. This application represents your Auth-Email integration, and will be used to request OAuth tokens for accessing mailboxes.
- Log in to the Microsoft Entra admin center with an administrator account.
- In the left-hand menu, select “App registrations” and then “New registration”.
- 💡 If you are already logged-in to the Entra admin center, you can use this direct link to the new app registration page.
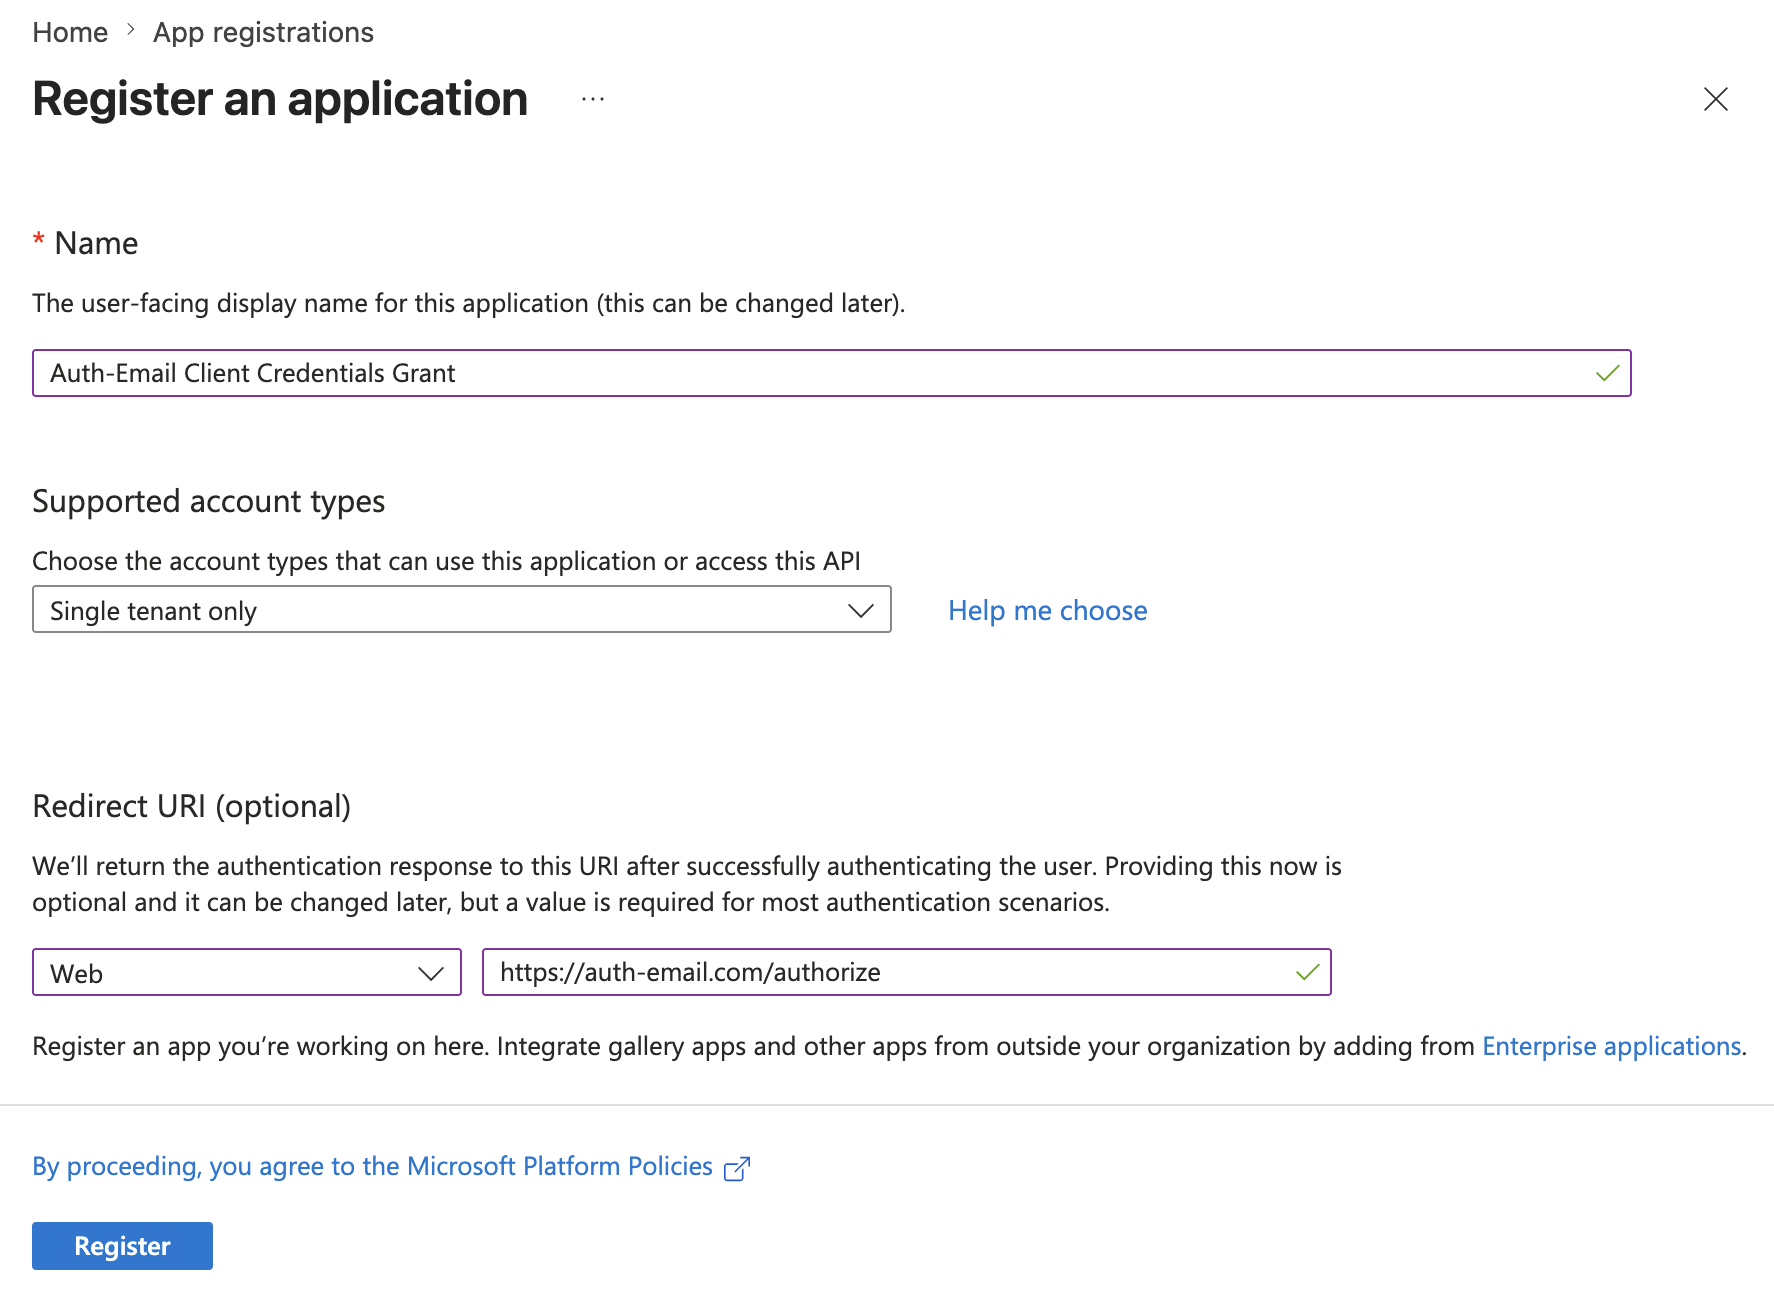
- Provide a name for the new application you will create (for example,
Auth-Email Client Credentials Grant). - For “Supported account types”, select
Single tenant only - {your organization name}. - Choose
Webin the “Redirect URI” field, and enterhttps://auth-email.com/authorize- 💡 Setting a redirect URI value is not required for the Client Credentials Grant flow, but if you intend to use multiple OAuth flow types in future (such as the Authorization Code Grant flow, or the Resource Owner Password Credentials Grant flow), it is worth adding a redirect URI, which lets you reuse this existing client registration.
- 💡 If you know you will not use this client with any other flow, you can leave the redirect URI field blank.
- 💡 You can add or modify redirect URIs later as needed via the “Authentication (Preview)” submenu item in your application’s Entra / Azure overview page.
- Click “Register” to create the application.
The following screenshot shows an example registration configuration:
2. Configure and grant permissions
After creating the application registration, you will be redirected to its overview page for further configuration. You can also return here later by selecting “App registrations” from the left-hand menu of the Entra admin center, then choosing your application from the “All applications” list.
- In the left-hand submenu, select “API permissions” and then “Add a permission” (located just above the table of permissions).
- In the popup, select the tab “APIs my organization uses”.
- Find and select
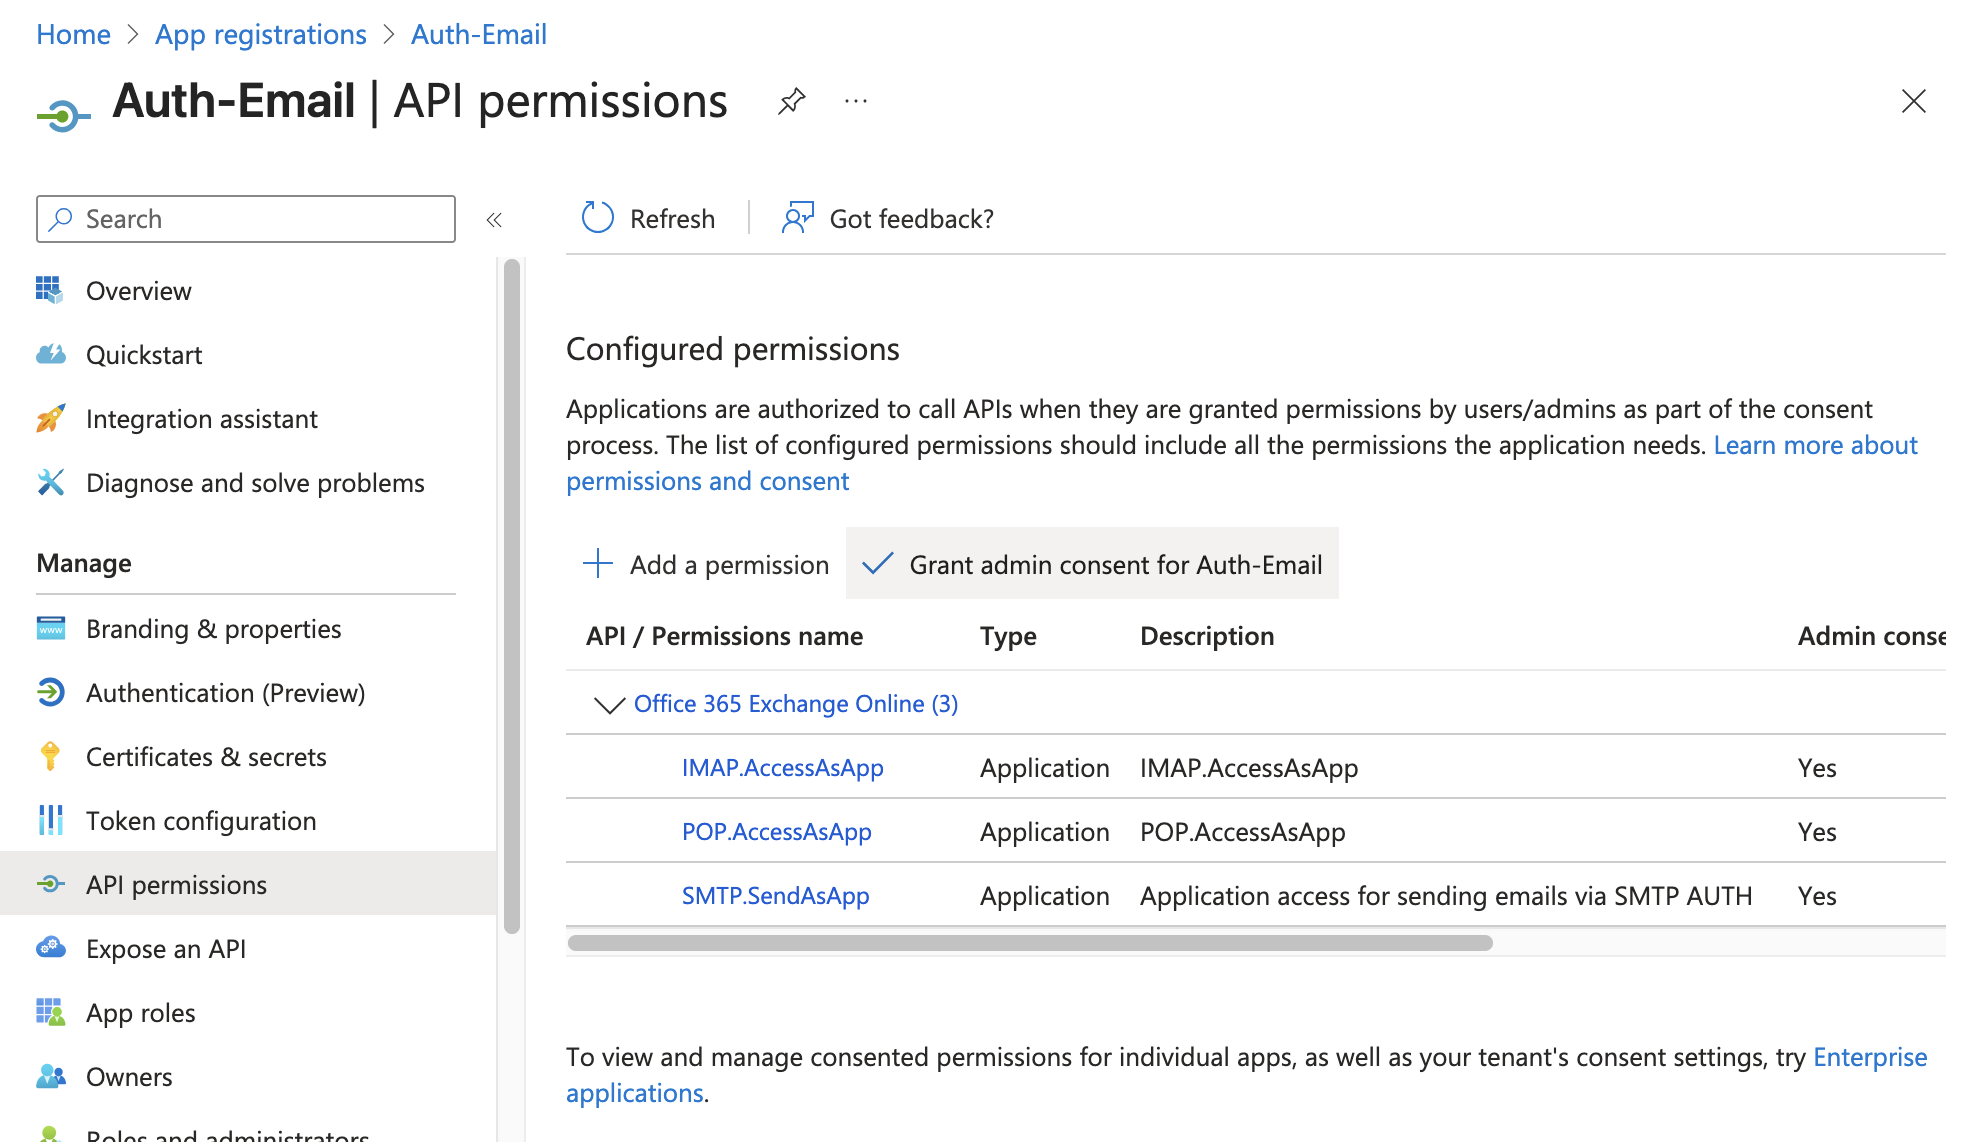
Office 365 Exchange Online, then choose “Application permissions”. - Expand the IMAP, POP, and SMTP sections, and select all of the following permissions:
IMAP.AccessAsAppPOP.AccessAsAppSMTP.SendAsApp- 💡 If you know you will only be using specific protocols, it is fine to add just those permissions.
- 💡 The
User.Readpermission is automatically added to all new applications, but it is not required for access via Auth-Email. You can leave this permission as-is, or remove it if you prefer.
- Click “Add permissions” at the bottom of the panel to save your changes.
The following screenshot shows the API permission configuration, granting IMAP, POP, and SMTP access:

After adding the required permissions, you will be returned to the API permissions overview page for your newly-created application. To allow your application to use the permissions you just selected, admin consent is now needed.
- Click the “Grant admin consent for
{your organization name}” button (located just above the table of permissions, as shown in the screenshot below). - In the confirmation popup, click “Yes” to give consent for the requested API permissions.
3. Install your new application
To allow your application to actually access mailboxes, you need to explicitly install it by creating a Service Principal in your Microsoft 365 tenant. This is the most complex step of the setup process, and requires use of PowerShell and the Exchange Online Management module.
First, configure PowerShell to connect to Exchange Online:
- Open PowerShell, or install it if necessary.
- If you haven’t previously used the Exchange Online Management module, run the following command to install it:
Install-Module -Name ExchangeOnlineManagement- 💡 Help installing the module can be found on Microsoft’s documentation pages if needed.
- Next, import the module using the following command:
Import-Module ExchangeOnlineManagement- 💡 If you see a script policy error, you may need to adjust your PowerShell execution policy (for example, via the command:
Set-ExecutionPolicy RemoteSigned). See Microsoft’s documentation for additional help.
- Log in to Exchange Online with an administrator account using the following command, replacing the placeholder value with your own:
Connect-ExchangeOnline -UserPrincipalName "{[email protected]}"- Before running the command:
- Replace
{[email protected]}with a tenant administrator’s address.
- Replace
- Authenticate with the administrator account when prompted.
Next, install your newly-created application:
- Return to the Microsoft Entra admin center, and in the left-hand main menu, select the section “Enterprise apps”
- In the “All applications” list, select your application. The two IDs you need for the next step are shown on the application’s overview page.
Run the following command to install your application and create a Service Principal, replacing the two placeholder values with your own:
New-ServicePrincipal -AppId "{application ID}" -ObjectId "{object ID}" -DisplayName "Auth-Email Client Credentials Grant"Before running the command:
- Replace
{application ID}with the “Application ID” value from the Entra enterprise application overview page. - Replace
{object ID}with the “Object ID” value from the same page. - 💡 Important: The “Object ID” that you need to use is not the same as the Object ID shown on the application’s overview screen from the app registration step. Make sure you use the Object ID from the “Enterprise apps” section.
- 💡 If needed, you can also customize the display name value.
- Replace
- Finally, for each mailbox you wish to use with Auth-Email, run the following command to grant access, replacing the two placeholder values with your own:
Add-MailboxPermission -Identity "{[email protected]}" -User "{object ID}" -AccessRights FullAccess- Before running the command:
- Replace
{[email protected]}with the address of the mailbox you wish to access. - Replace*
{object ID}* with the “Object ID” value from the previous step. - 💡 Important: As in the previous step, you must use the Object ID from the “Enterprise apps” section, not the app registration section.
- 💡 Make sure you repeat this command individually with the address of each mailbox you want to access.
- Replace
4. Create and link a client configuration
The final configuration step is to generate credentials for your newly-created application. Return to the Microsoft Entra admin center, and select the “App registrations” section from the left-hand menu, then choose your application from the “All applications” list.
- In the left-hand menu, select “Certificates & secrets”.
- In the “Client secrets” tab, select “New client secret”.
- Provide a description (for example,
Auth-Email Client Credentials Grant Secret) and select an expiration period. - We recommend including the expiry date in the secret description to help you track when it needs to be rotated.
- Click “Add” to create the client secret. The new client secret will be displayed in the list.
- Copy the “Value” of the client secret and save it for the next step.
- 💡 Important: This value is needed for integrating with Auth-Email. You will not be able to retrieve it later, so make sure you copy and save it now.
- In the left-hand menu, select “Overview” to view the completed application’s details. Keep this page open while you move to the next step.
Now that you have created and authorized the new Entra / Azure application, you can link it with Auth-Email.
- Log in to your Auth-Email dashboard, then visit the Acccount settings page.
- In the “Custom OAuth clients” section, select “Add client”.
- Give the client a name (for example,
{Your organization name} Client Credentials Grant), and selectMicrosoftas the service provider. - In the “OAuth flow / grant“ dropdown box, select
Client credentials. - In the “Token URL“ field, enter the following URL, replacing the placeholder value with your own:
https://login.microsoftonline.com/{tenant}/oauth2/v2.0/token- Replace
{tenant}with the “Directory (tenant) ID” value shown on your newly-created application’s overview page:
- Leave the “OAuth scope“ field as its default value.
- Enter the “Application (client) ID“ from your Entra application into the “Client ID“ field.
- Enter the client secret value you saved earlier into the “Client secret“ field.
- Click “Add client” to create the custom OAuth client.
Finally: test your setup
You can now select this custom OAuth client when authorizing email accounts in Auth-Email. Instead of proceeding with the default authorization method, choose your newly-created application in the list at the bottom of the Auth-Email account authorization page, then enter a login password that you will use to access this account. Click “Complete setup” to link and activate your account.
Your account is now available to be used over standard IMAP, POP, or SMTP using using its address and the password you just set. See the configuration step of our getting started guide for help setting up your email client if needed.
💡 Make sure you have granted your Entra / Azure application permission to access an account before trying to use it via Auth-Email. You can re-run the
Add-MailboxPermissioncommand above to add new accounts anytime (just be sure to log in into the account at least once before running the command, to ensure the mailbox is fully provisioned).