Linking Microsoft Dynamics CRM to an OAuth mailbox
Microsoft Dynamics CRM 2016 is a popular customer relationship management (CRM) platform that can be configured to send and receive emails using your existing email account.
This setup guide walks you through setting up sending and receiving emails from Microsoft 365, Gmail, or other providers even though Dynamics CRM 2016 does not support modern OAuth authentication protocols. This allows you to continue using your existing email account with your CRM securely and without needing to switch to a new email provider or upgrade your CRM instance.
Step 1: Enable legacy SSL/TLS in Auth-Email
Depending on your operating system and CRM server configuration, you may need to enable legacy SSL/TLS mode in your Auth-Email account settings. It is worth doing this step first before configuring your CRM in order to verify that your account is set up correctly and can connect to Auth-Email’s servers.
- Log into your Auth-Email dashboard
- Locate the account you want to use with Microsoft Dynamics CRM 2016, and expand the account configuration details panel if it is not already visible
- At the bottom, locate the “Enable legacy SSL/TLS” toggle, and make sure it is enabled
- At the bottom, locate the “Require TLS SNI” toggle, and make sure it is disabled
- Your changes are saved automatically
This allows your CRM to connect to Auth-Email using opportunistic SSL/TLS (STARTTLS) using protocols and ciphers that it understands.
Step 2: Configure Microsoft Dynamics CRM 2016
There are two key steps to configure for use with Auth-Email. The first is to configure an email profile that will be used by all mailboxes. The second step is to configure all mailboxes to use that profile, and the password you set up when linking your account with Auth-Email.
Enter the details shown below in each screen. Make sure you use the correct server names and ports as shown in the Auth-Email dashboard for your account. Show configurations for an account provided by Outlook:
1. Add an email profile
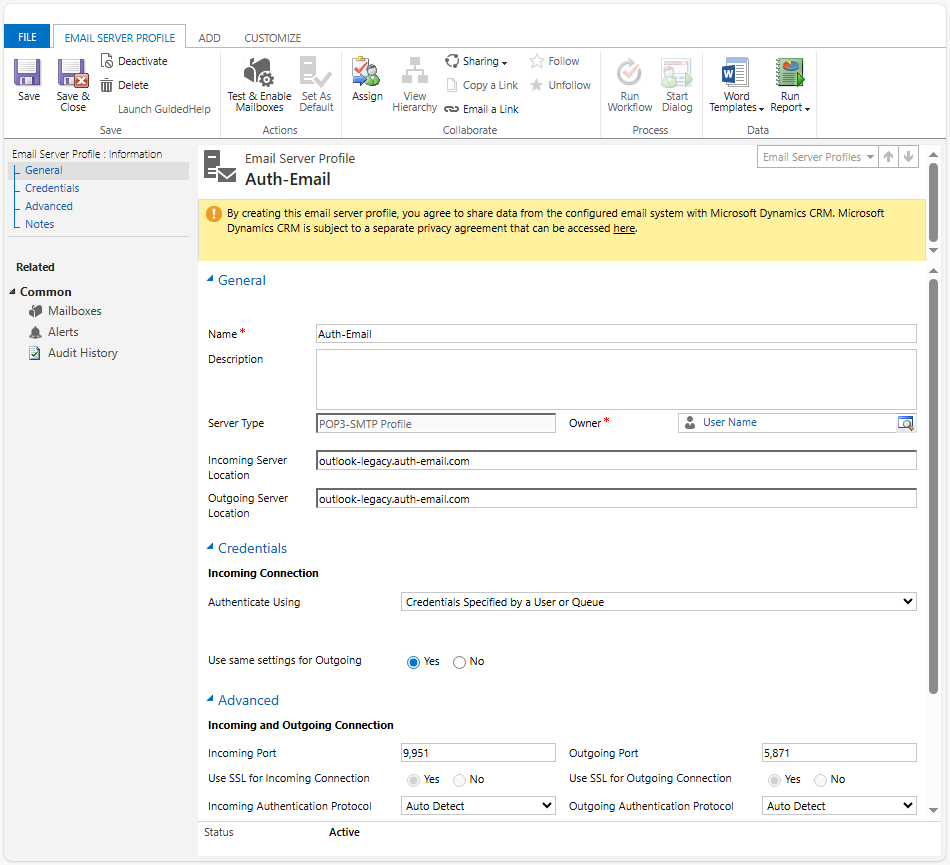
From the main CRM dashboard, open the menu (☰) and navigate to Settings > System > Email Configuration. Once the email configuration screen has loaded, choose “Email Server Profiles”, and then New > POP3-SMTP Profile from the toolbar. Enter the following details in the form, leaving the other options as their default values:
- General:
- Name: A name to identify this email profile (e.g., “Auth-Email”)
- Incoming server location:
outlook-legacy.auth-email.com - Outgoing server location:
outlook-legacy.auth-email.com
- Credentials:
- Authenticate using:
Credentials Specified by a User or Queue - Use same settings for Outgoing:
Yes
- Authenticate using:
- Advanced:
- Incoming Port:
9951 - Use SSL for Incoming Connection:
Yes - Incoming Authentication Protocol:
Auto Detect - Outgoing Port:
5871 - Use SSL for Outgoing Connection:
Yes - Outgoing Authentication Protocol:
Auto Detect
- Incoming Port:
Choose Save and Close from the toolbar when you’re done. Here’s an example of what the completed New Email Server Profile screen looks like in Microsoft Dynamics CRM 2016 when using Outlook:
2. Configure mailboxes to use the new profile
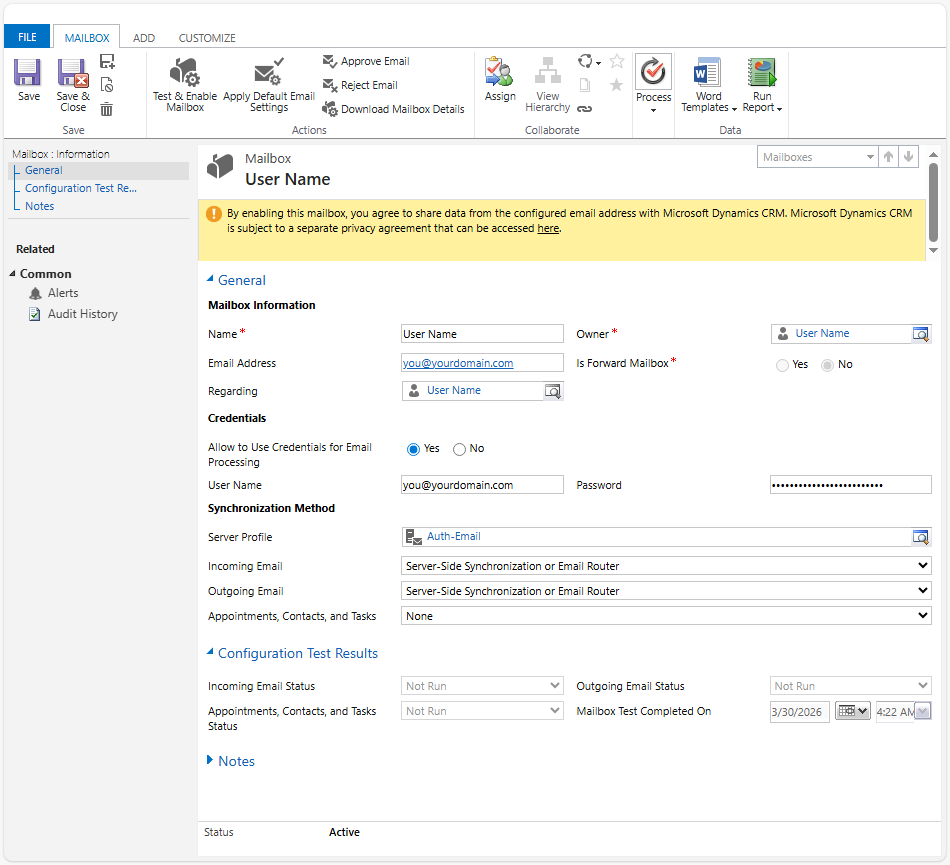
Return to the Email Configuration screen, and this time select the “Mailboxes” option. If you already have mailboxes set up, open an existing item that you need to redirect via Auth-Email by clicking its entry in the Name column. If you have not yet set up mailboxes, create a new user or forward mailbox. Enter the following details in the form, leaving the other options as their default values:
- General:
- Name: The name that will be shown when emails are sent from this mailbox (e.g., “Your Company Name”)
- Email Address: Your full mailbox email address (e.g.,
[email protected])
- Credentials:
- Allow to Use Credentials for Email Processing:
Yes - User Name: Your full mailbox email address (e.g.,
[email protected]) - Password: The password you set during account authorization in the Auth-Email dashboard. Don’t use your actual email account password here. If you’ve forgotten the password you chose, you can reset it in the Auth-Email dashboard by re-authorizing the account. If you need to do this, you don't need to change anything in the Dynamics CRM mailbox configuration except the password.
- Allow to Use Credentials for Email Processing:
- Synchronization Method:
- Server Profile: The email profile you created in the previous step (e.g., “Auth-Email”)
- Incoming Email:
Server-Side Synchronization or Email Router - Outgoing Email:
Server-Side Synchronization or Email Router
Choose “Save” from the toolbar when you’re done. Here’s an example of what the Mailbox options screen looks like for a sample account:
You’re ready to go!
Once you’ve completed these steps:
- If you created a new mailbox, you may need to approve its creation by clicking “Approve Email” from the toolbar in the mailbox configuration screen.
- You can verify the account setup from the mailbox configuration screen by choosing “Test & Enable Mailbox” from the toolbar. You may be prompted to approve this action – if so, choose “OK” to allow Dynamics CRM to connect to Auth-Email and verify the account settings by sending and recieving a test message.
- If the test fails, double-check your Auth-Email account credentials and the legacy SSL/TLS toggle
💡 Need more help?
If you run into any issues, please reach out to us at [email protected] — we’ll help you get things working.